Thursday, April 23, 2026

F5+ASM+XFF header

 When using ASM with conjunction with LTM+XFF sometimes based on the traffic path XFF header would have multiple IP address.

Example -
X-Forwarded-For: 8.8.8.8 4.4.4.2 10.137.255.232

Real value of XFF header is furthest left IP which is 8.8.8.8, But F5 selects the middle IP 4.4.4.2 because it's most "Trusted" in the context of RFC so we have to make sure that the leftmost one is selected via iRule.

Thursday, January 4, 2024

F5 SSL traffic capture and decrypt - iRule

 To capture SSL traffic and decrypt it on a virtual we can use the below iRule.

First create the iRule and save it example SSL_Decrypt_iRule

when CLIENTSSL_HANDSHAKE {
    log local0. "Client Side [IP::client_addr][TCP::client_port] :: RSA Session-ID:[SSL::sessionid] Master-Key:[SSL::sessionsecret]"
  }
when SERVERSSL_HANDSHAKE {
    log local0. "Server Side [IP::client_addr][TCP::client_port] :: RSA Session-ID:[SSL::sessionid] Master-Key:[SSL::sessionsecret]"
}
Attach this to the VIP for the duration of the test. Don't forget to remove it after or else it will keep logging the Session ID's to the log file.

After the tcp capture is completed, use the below command from CLI to extract the session keys to the pms file

sed -e 's/^.*\(RSA Session-ID\)/\1/;tx;d;:x' /var/log/ltm > /var/tmp/problem.pms

Now open the pcap and use the pms file to decrypt the requests.

Extract F5 ASM attack signature rule

 Just for troubleshooting if you need to extract ASM signature rules run the below on a device that is not heavily used or after hours since its process intensive from the CLI.

"mysql -uasm -p`perl -I/ts/packages -MF5::Cfg -e 'print F5::Cfg::get_mysql_password()'` PLC -e "select PLC.NEGSIG_SETS.set_name,PLC.NEGSIG_SETS.set_id,PLC.NEGSIG_SIGNATURES.sig_id,PLC.NEGSIG_SIGNATURES.sig_name,PLC.NEGSIG_SIGNATURES.rule  from PLC.NEGSIG_SETS,PLC.NEGSIG_SIGNATURES order by set_name,sig_id;" > /var/tmp/unit1_sig_sets.out"

Sunday, September 4, 2016

F5 scheduled backup script.

F5 scheduled backup script


I needed an automatic backup solution to backup LTM's and GTM's devices in my environment. The below scripts would generate UCS, scf files and would then transfer the files to FTP server.
 
Create 2 files dailybackup.sh and monthlybackup.sh

Copy the below code into those files. Daily backup will be send to the FTP server and I needed monthly backup which runs once every month to be on the device. The only change that needs to be done here is FTP SERVER IP, FTP USER and FTP PASSWORD and the beginning of the script and it should work fine.
 
Daily – Backup files sent to FTP server
Monthly – Backup files on the F5 devices @ /var/local/usc and /var/local/scf folders


Daily backup script –

#!/bin/bash
#/home/root/dailyf5backup.sh

HOST="<>"      # FTP Server IP
USER="<>"       # FTP User
PASS="<>"    # FTP Password
DIR="/"        # FTP Directory


#Create current date/time stamp variable
DATETIME=$( date '+%Y-%m-%d_%H-%M' )


#Create hostname variable
HOSTNAME=$(uname -n| cut -f 1 -d".")

UCS_FILENAME="${DATETIME}_$HOSTNAME"
SCF_FILENAME="${DATETIME}_$HOSTNAME"


#Delete files that are older than 10 days
find /var/tmp/*.tar -mtime +10 -type f -delete
find /var/tmp/*.scf -mtime +10 -type f -delete
find /var/tmp/*.ucs -mtime +10 -type f -delete
logger -p local0.info -t BIGIP configuration backup started.
cd /config
tmsh save /sys config
tmsh save /sys ucs /var/tmp/$UCS_FILENAME.ucs
tmsh save sys config file /var/tmp/$SCF_FILENAME.scf
logger -p local0.info -t BIGIP configuration upload to $HOST started.
FILE=/var/tmp/$hostname.ucs
TONAME=$hostname-$DATE.ucs
ftp -inv $HOST<    user $USER $PASS
    bin
    lcd /var/tmp
    cd $DIR
    put $UCS_FILENAME.ucs
 put $SCF_FILENAME.scf
 put *.tar
   quit
END_SCRIPT
logger -p local0.info -t BIGIP configuration upload to $HOST completed.
logger -p local0.info -t BIGIP configuration backup completed.
exit 0


Monthly backup script -

#!/bin/bash
#/home/root/monthlyf5backup.sh
#
#UCS Files will be saved to /var/local/ucs/
#SCF Files will be saved to /var/local/scf/

#Create current date/time stamp variable
DATETIME=$( date '+%Y-%m-%d_%H-%M' )

#Create hostname variable
HOSTNAME=$(uname -n| cut -f 1 -d".")


#Uncomment the following line for troubleshooting
#echo $DATETIME

#Create filename variable
UCS_FILENAME="${DATETIME}_$HOSTNAME"


#Uncomment the following line for troubleshooting
#echo $UCS_FILENAME


#Save the system config before saving UCS and SCF files.
tmsh save /sys config


#Create a UCS archive with the filename specified above

#The file extension will be .ucs will be available in the GUI
tmsh save sys ucs "${UCS_FILENAME}"


#Also create an SCF file with the same filename
#The file extension will be .scf won't be available in the GUI
tmsh save sys config file "${UCS_FILENAME}.scf"


#If you don’t delete these files /var will become full fairly quickly
#Change the +31 value (10 days) to whatever suits you
#find /var/local/ucs/*.ucs -mtime +10 -type f -delete
#find /var/local/scf/*.scf -mtime +10 -type f -delete\
#find /var/local/scf/*.scf.tar -mtime +10 -type f -delete
#EOF


To make the above scripts executable run the below command –
Chmod u+x /home/root/backup.sh ( I shored my scripts @ /home/root
..and finally both the scripts to the cronjob daily to run every day, monthly to run on first of every month.


crontab -e
type: crontab -e and add the following line, as the bigip is using vim as editor for crontab, you have just to type i for insert first. After inserting   the line below just hit Escape and type :wq for write and quit

@daily /home/root/dailyf5backup.sh
@monthly /home/root/maonthlyf5.backup.sh


One thing to remember is when the BigIP devices are updated with newer versions of firmware, the copy config does not move these backup scripts so you have to do this all over again or store these scripts in /shared/tmp folder.

Enjoy...!

Wednesday, August 24, 2016

What is F5 license dates and service check date?

On the BigIP device under /config --> you can see a file called bigip.license. This file is typically your license file which has information like what modules are provisioned, list out any additional licenses that were added, platform id. Serial number etc.

Now before upgrading your F5 device its always recommended that admin should reactivate the license. What happens during this process is that the service check date would get updated in bigip.license file which will then allow you to upgrade to the latest and greatest firmware. This is based on your active support contract.

If the license is not Re-Activated and the Service check date is earlier than license check date then the config will not load. You will get an error saying - Config failed to load....

Fail - Service check date is 1/1/2016 and License date is 3/18/2016 (this is just as an example)

Pass - Service check date is 4/1/2016 and License date is 3/18/2016

Service check date - is updated each time when you re-activate the license based on your active support contract.
License check date  - is a static date corresponding to the software version.


The above F5 link provides the license dates for different versions.


Wednesday, June 24, 2015

Connection reaping

Can be defined as the process of manually cleaning/clearing the inactive/stale connections from the connection table.

Big IP maintains every connection in the connection table. (Server side and client side). Each connection uses LTM resources since they are monitored.So that is why this connection table can not grow to big or else all the resources are used to maintain this table which might lead to starvation of resources when/where they are actually needed.

Some connection might have a tear down sequence while others might not. It depends on the protocol as well for example TCP usually would have this tear down sequence but UDP will not since its connectionless. So F5 depends on the idle timeout values to remove old, stale connections. The idle timeout values can be manipulated by using profile assigned to the VIP - Virtual IP of the LTM device.

Tuesday, February 3, 2015

Checkpoint Lab - 11 (LDAP integration) Tutorial

LDAP Integration

Before we proceed for the lab setup I am using Microsoft Active Directory for LDAP. Its configured and setup - itlinks.com. Create 4-6 test users and one user with admin credentials - cpadmin

There are multiple ways to authenticate or tie your users if you will to a centralized auth like LDAP. You can create users locally and give out id/password to your users, configure LDAP, RADIUS or TACACS ect to manage and give access to users. Once the LDAP is setup Check point then can make queries against the LDAP server and read the user data. The calls to the LDAP server can be encrypted (port 636) or unencrypted (port 389).

Create users locally - This is very simple method. If you have a small environment small number of users can be created manually with ease. But if you have 1000 users at that point you might consider integrating it with LDAP.
Backup the existing policy on which you have been working so far. Create a db revision to restore if any thing goes wrong.
Select the user container, right click select new user, select default.

In General properties enter the user name and other relevant information.


Option to create groups and club the users under groups is available as well. Since this is a local user creation under "Authentication"  select "Check Point Password" and enter the password and save the user.


Example of group creation and adding the user to the group is below.
For adding LDAP server follow the below steps -
Create a user id (cpadmin) in AD to be used by checkpoint exclusively to query the LDAP db.
Create a bridge from checkpoint to LDAP server.
Create a LDAP group that utilizes this bridge and gets the user information.
I created a group called "Firewall" in the AD and in that group I have the users as listed below -


Next open the "Global properties" from Smart Dashboard and check the below option -


Again from the dashboard open "Launch Menu" --> Manage --> "Servers and OPSEC Applications"


It opens up a window, internal_ca is default value that is pre populated. To create bridge click "New" and select "LDAP Account Unit"


Here in the LDAP account unit the AD server details and id that has rights to query the AD needs to be entered as shown below. If you also want to manage CRL and users check the boxes highlighted below.


Servers tab is used to add the LDAP server itself and provide the user details. Click "Add"


I created an object called "MainDC" which is the active directory server. Port is selected as 389 and input the other info as per the screen print. Check the encryption when you can setup the secure communication. I would advice if its a production to go and use that option,but here since this is a lab setup I will use the unsecured communication.


Click ok and you will see -


Select the "Object Management" tab and click on "Fetch Branches" tab, if the config is correct it will query the AD and display as below


Finally on the "Authentication" tab select "Checkpoint Password"


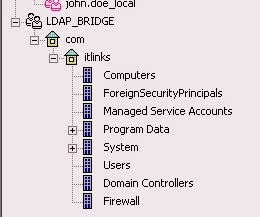
Once the bridge config is done, its visible under "Users and Administration" container. Right click and choose "Update tree" , its going to pull the entire AD content..

So far good, the remaining task is to create a group utilizing this bridge. Right click the "LDAP Groups" and enter a name that you want to reference it as, select the account unit and in group scopes you can define Sub trees since its X.509 Compatiable.


So this is how we link check point to LDAP server.